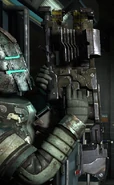
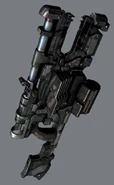
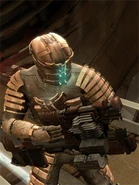
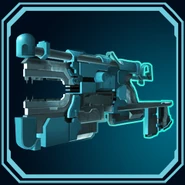
- "A heavy-duty energy pulse device, the Contact Beam is used for commercial destruction where a powerful but focused explosive force is needed. The alt-fire delivers a ground clearing-blast around the user."
- —Dead Space 2 Manual
The C99 Supercollider Contact Beam, also referred to simply as the Contact Beam, is a heavy engineering tool designed to pound and soften hard, raw minerals into smaller pieces.
Precious ores and minerals are sometime contained within large toughened rocks, which poses a problem to smaller mining equipment. That's where a C99 Supercollider Contact Beam comes in, it is designed specifically for splitting and obliterating tough materials and meteors, for easy extraction of the ore within.
The tool is immensely powerful and handy against tough enemies. However, the primary fire has to be charged for a short time until it can be fired.
Design Details
Like the Force Gun, the Contact Beam is an energy projector that utilizes kinetic energy. As its name suggests, it is a miniaturized particle accelerator intended for mining operations.
To operate to its actual purpose, the Contact Beam needs to be charged for a brief period. When fully charged and fired, the Contact Beam delivers a huge kinetic discharge that obliterates anything it comes into contact. As such, the weapon trades speed and precision for damage.
The kinetic discharge is very powerful to the point where most Necromorphs can be killed in one shot, even prior to upgrades. If not charged, the Contact Beam acts as a simple short-range weapon. The Contact Beam's secondary fire acts much like the Pulse Rifle's (In the original Dead Space) where it unleashes a small radial ground-based shock wave that knocks objects away from the wielder.
Location
- The Contact Beam Schematic can be found in Chapter 4 of Dead Space, en route to the first junction box after enabling the Atrium elevators, in the middle of a short corridor near the elevator.
- In Dead Space 2, the Schematic for the Contact Beam is found in a locked room shortly after shutting down ANTI and right before the elevator leading up to the Solar Array. The room requires a Power Node to open.
- The location of the blueprint for it in Dead Space 3 is in Chapter 11 in the optional mission: Armory, towards munitions control.
Variants
- Hacker Contact Beam (DS2 primary fire charge reduced by 0.1 seconds, secondary fire damage increase by 5%)
- Heavy-Duty Contact Beam (DS2 primary fire charge reduced by 0.1 seconds, damage 5%)
- Military Contact Beam (DS1)
- Heavy Damage Contact Beam (DS1)
- Pedestrian Contact Beam (DS1)
Ammunition for the Contact Beam can be purchased in the Store for 2,000 credits for one shot. In Dead Space 2, the ammo is 4,000 credits for two shots, this means that contact ammo drops are worth 2,000 credits, making them the most valuable ammo drop in the game - and a good reason to carry it in your inventory at all times, as it causes the ammo to drop more often. Twenty slots filled with six shots each results in a whopping 120,000 credits if you choose to sell them.
Combat Tips
- The Contact Beam is one of the most powerful and difficult weapons to wield in Dead Space. The primary fire takes one second (when not fully upgraded) to completely charge up while the primary fire button is held down. Once mastered, the Contact Beam can be deadly; however, its small magazine size and sparse ammunition drops make accuracy of paramount importance.
- The primary fire is powerful enough to kill nearly every creature regardless of where the shot hits, so simply focus on hitting the creature. The Contact Beam is highly effective against Brutes as a single shot behind the Brute is capable of slicing an arm off. In Dead Space 2, a single shot from the front can sever a Brute arm. If the player manages to fully upgrade their Contact Beam's damage, a single shot can even instantly kill a Brute (except on Impossible/ Hard Core mode). The secondary fire is best used when the player is surrounded or cornered by Necromorphs, as it can knock them back and buy time for an escape. It should be noted that this should be used primarily as a means of creating breathing room between you and your enemies. It should not be employed at a means of damaging enemies, as damage from the blast is negligible.
- The Contact Beam's primary fire does not travel through multiple enemies and it should be focused at one at a time. This makes it a poor weapon for crowd control, so consider switching to a different weapon if you are being swarmed by a large number of enemies.
- Conversely, the Contact Beam's secondary fire is an excellent crowd control weapon, knocking down any enemy near you in any direction.
- Ammunition comes very sparsely across the game, where a single pack of Contact Energy only has enough charge to power one shot. Packs can only hold four shots (6 in Dead Space 2) before more inventory space is used.
- Conversely, in Dead Space 2 (on lower difficulties), Contact Energy is very common, and can easily fill your entire inventory.
- The secondary firing mode is capable of taking out many Swarmers with one shot, even on impossible mode. You can use it to give yourself some breathing room if they get too close - if you have the ammo to spare. It will even kill them if they have already grabbed on to you, making this a great emergency tool if you're ambushed by a large group of them. Although the Alt-fire is very effective on Swarmers the Primary fire is not effective at all on large groups of Swarmers because the "Area of Effect" is not big so you should stick with the Alt-fire.
- The Contact Beam is highly effective against the Leviathan's tentacles - a well-placed shot can sever a tentacle in a single blow, especially with a damage upgrade.
- If Isaac is hit when alt-firing, he will still take damage but the firing animation is not disrupted unless the damage taken is enough to kill or knock Isaac off his feet. Stalkers and Brutes are prime examples of this.
- The primary fire will briefly stun weaker Necromorphs if the beam travels close enough to them, even when it never hits them. However, this doesn't seem to deal damage.
- When fully upgraded in Dead Space 2, it takes just 0.4 seconds to charge up, which means it can fire almost three shots per second. It is actually faster than some of the heavier tools such as Line Gun or Javelin Gun.
- In Dead Space 2, the Alt-Fire is far more powerful than in the original Dead Space. It can now one-shot any existing common Necromorphs, including Enhanced Slashers if they're close enough to Isaac. Furthermore, it will stasis all enemies caught in its blast radius when upgraded.
- In Dead Space 2 it is the most valuable ammo to sell, at 1000 Credits each, 2 per drop(normal difficulty). If you have the space, it can be useful to keep in inventory.
- In Dead Space 2 the Contact Beam's ammo stack size has been increased to 6 per equipment slot.
- In Dead Space 2, the Contact Beam's node tree lacks damage nodes, so you do not have to worry about boosting the tool's damage output (which is higher than it was in DS1, giving that it can now kill Super Necromorphs instantly on any difficulty) when you buy it from the Store. However, there are more reloading nodes present, as the un-upgraded reloading sequence is much longer than it was in DS1. Since the long reload time can give enemies an opportunity to strike, it is vital that you upgrade the reloading speed.
- The Contact Beam is the most effective weapon for the final battle in Dead Space 2. On Normal difficulty, a single shot can expose the final boss' weak point, and a second shot can destroy it, ending the fight before you are overwhelmed by the unending onslaught of other adversaries. On higher difficulties it can take 2-3 barrages like this to destroy the boss, but every time it is rendered vulnerable the Pack disappears, thus making this a relatively safe and easy battle. On Zealot difficulty, a fully upgraded (primary firing) Contact Beam can end the fight in under 8 seconds, before any of the Pack can reach you.
- The Contact beam can kill Pregnants without releasing its swarm, no matter where you hit, especially when upgraded, and even on harder difficulties. (This does not hold true in the second game, as the weapon's increased eviscerating power makes it nearly impossible to kill a Pregnant without releasing its swarm. )
- On harder difficulties, it is vital to remember that releasing the aim button (LT or L1 on consoles) will cancel any pointless or accidental charges; since Contact ammo is scarce even on easy difficulties, any waste can severely hinder progress or even survival.
- A charging Stalker can interupt the Contact Beam's alt fire animation, knocking you on your back and canceling the shot. Unless you can time the shock wave perfectly, the Alt - Fire is a poor choice against Stalkers.
Trivia
- There are contradictions to the weight of the Contact Beam. Isaac was seen leaning when handling it, indicating it is heavy. However, Nathan McNeill was able to use it with one hand after his other had been severed indicating it is lightweight, or that he is stronger than Isaac. (Or he just simply had no choice.)
- In Dead Space 2, however, the weapon seemed to be much lighter than that of Dead Space, as Isaac is able to hold it normally and can even lift it up to his face during the reload animation.
- A Contact Beam was probably the suicide weapon referenced in an audio log found on the Mining Deck. The miner who recorded the log used the tool to first blow off his legs, then somehow dismembering his entire upper torso with the second blast. The Contact Beam's signature charging-up sound is heard moments before each shot, further cementing this theory.
- The Contact Beam is the first weapon in the series to be identifiable by its firing sound. Gabe Weller recognized the sound of the tool firing shortly before Nathan McNeill arrived, having just fired the weapon seconds prior.
- The Contact Beam can be fully recreated by placing a Precision-tipped Plasma Core as the Upper Tool on a Heavy Frame, and a Diffraction Torus-tipped Plasma Core (resulting in the Ground Diffractor) as the lower tool, plus a Stasis Coating attachment.
- Despite its size, it takes a relatively short time to reload, even when not upgraded. Isaac simply needs to put in a new battery and he's done. In Dead Space 2 however, Isaac needs to let the weapon vent steam for a considerable amount of time until upgraded.
- It makes a comeback in Dead Space 2 like the rest of the usable weapons in the original Dead Space.
- In Dead Space 2, if you had played the game Dead Space: Ignition and have a save game, you get a Hacker Contact Beam to go along with the Hacker RIG. The RIG is found in a Conduit Room in Chapter 2, while the Hacker Contact Beam is located in a Conduit Room as well in Chapter 9.
- Like most of the weapons in Dead Space 2 it has its own trophy/achievement called "C-Section". To earn it, you must knock an enemy down with the Alt-Fire then kill it with the primary fire before it gets up. This is best done with a basic (unupgraded) Contact Beam, as the fully upgraded alt fire can kill and completely dismember any enemy it hits.
- In Dead Space killing 30 enemies with the Contact Beam earns the "Full Contact" Achievement/Trophy
- In Dead Space, when the damage is fully upgraded, charging the weapon will not produce a bright flash of yellow-white light. Instead, when charged, a small greenish-yellow flame will continually flicker at the end of the barrel of the weapon.
- There is a glitch on Dead Space 2, when Isaac touches a Necromorph corpse killed by stasis-upgraded alt-fire blast, sometimes the corpse will 'hit' him.
- In Dead Space 2, if the player sets the aiming mode to Classic, the reticules will be the 3 dots like in Dead Space.
- To use the secondary fire, Isaac shoots the ground using the primary fire.
- If upgraded, the Contact Beam's alt fire can stasis a Necromorph within radius without draining the suit stasis.
- Even on Zealot difficulty, a fully charged Contact Beam can fully dismember a Necromorph.
- When Isaac or Gabe uses the Contact Beam's alt fire, they don't flinch from any attacks (except for a Stalker's charge) while the animation plays.
- Isaac turns his head away when reloading the Contact Beam, indicating it might blur his visor or damage his helmet.
- The Contact Beam utilizes three blue laser reticules as its firing indicator in Dead Space, similar to that of the Plasma Cutter, albeit slightly narrower and in a vertical line. In Dead Space 2, the crosshair is changed to a single dot.
- The aiming laser becomes the three-dot crosshair again, if the aiming mode is set to "original".
- In Dead Space: Catalyst, an engineer uses a Contact Beam to dig slowly through rock, complaining because that tool is used to clear piles of rubble, not solid rock. The Contact Beam manages to turn several feet of rock to rubble before burning down.
- In Dead Space 3, the Contact Beam blueprint can be used to effectively recreate the Contact Beam, although its appearance is drastically different from its previous incarnations, and its primary fire and secondary fire have separate ammunition loads.
- The Contact Beam can be fully recreated by placing a Precision-tipped Plasma Core as the Upper Tool on a Heavy Frame, and a Diffraction Torus-tipped Plasma Core (resulting in the Ground Diffractor) as the lower tool, plus a Stasis Coating attachment.
- Hacker Contact Beam has ' DMG 78' print, but it's real damage is 100 (unupgraded).
Appearances
- Dead Space: Extraction
- Dead Space: Downfall (possibly the weapon a miner used to kill two men)
- Dead Space: Catalyst
- Dead Space
- Dead Space 2
- Dead Space 2: Severed
- Dead Space 3
- Dead Space 3: Awakened
Gallery
| ||||||||||||||||||||||||||


